
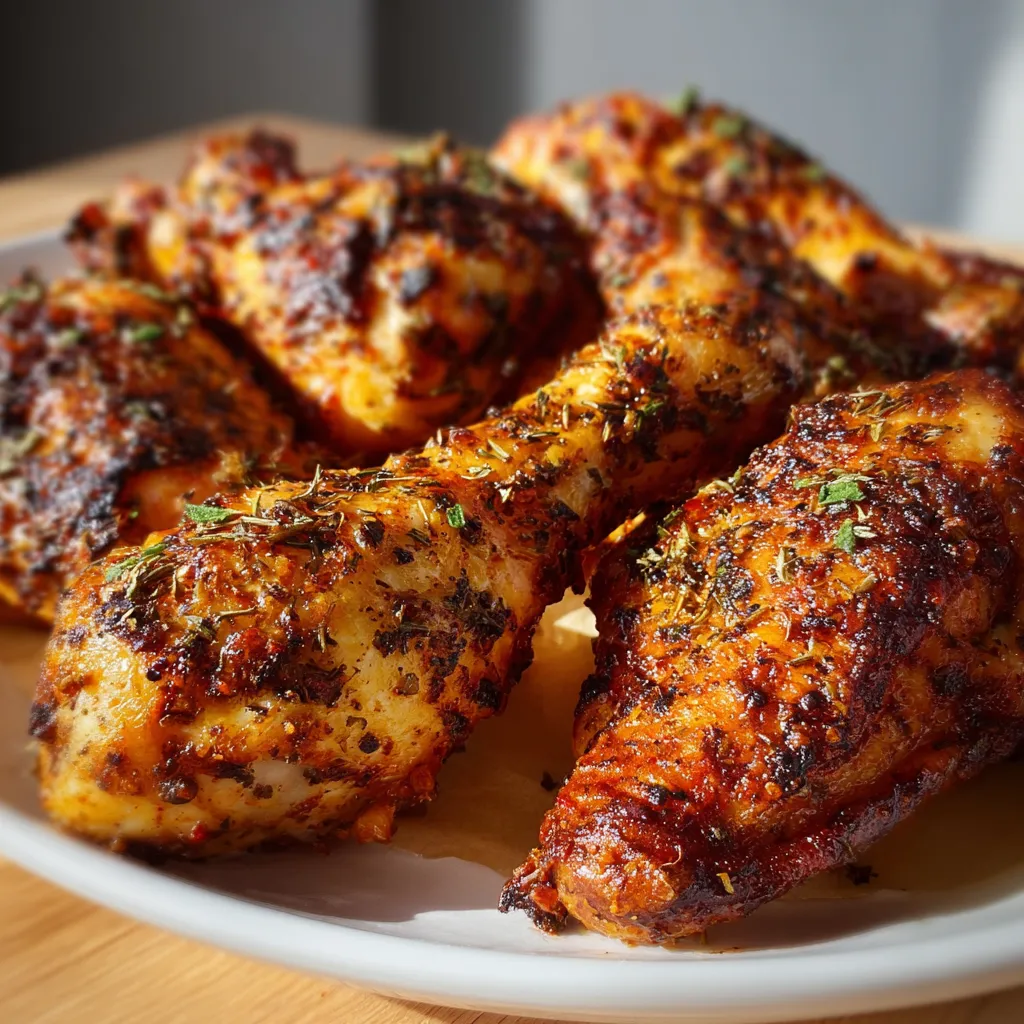
I can still picture my grandma, apron dusted with flour, pulling a sheet pan of glistening chicken drumsticks from her ancient oven. The smell alone was enough to make your mouth water, and the taste? Unforgettable! It was pure comfort food, simple and satisfying. I’ve spent years trying to recreate that magic, and I’m thrilled to say I’ve finally cracked the code for incredibly Easy Oven Baked Chicken Drumsticks – Crispy & Quick! that will have everyone asking for seconds. Today, I’m sharing all my secrets for the most amazing crispy baked drumsticks you’ll ever make!
The Secret to Perfect Oven Baked Chicken Drumsticks

Okay, let’s talk drumsticks! We’re not just aiming for cooked; we’re aiming for crispy, juicy, and packed with flavor. Achieving this isn’t as complicated as you might think. It all boils down to a few key elements: proper preparation, the right oven temperature, and a killer seasoning blend. Trust me, once you master these basics, you’ll be whipping up these drumsticks on repeat!
What You’ll Need: The Ingredients
Let’s gather our troops, shall we? Here’s what you’ll need to create drumstick perfection:
- Chicken Drumsticks: Obviously! Aim for about 2-3 drumsticks per person, depending on appetites.
- Olive Oil (or your favorite cooking oil): This helps the seasoning adhere and promotes browning.
- Salt & Pepper: The foundation of all good seasoning. Don’t be shy!
- Garlic Powder: Adds that savory depth we all love.
- Onion Powder: Complements the garlic powder beautifully.
- Paprika: For color and a touch of smoky sweetness. Smoked paprika is even better!
- Dried Oregano: Adds a subtle herbaceous note.
- Optional Extras: Cayenne pepper (for a kick!), brown sugar (for sweetness and caramelization), or your favorite herbs and spices.
Prepping Your Drumsticks: The Key to Crispiness
This step is crucial, my friend. Don’t skip it! Proper prep ensures even cooking and maximum crispiness.
- Pat Them Dry: This is non-negotiable. Use paper towels to thoroughly dry each drumstick. Moisture is the enemy of crispy skin! Think of it like this: you want to remove all the excess water so the skin can get crispy.
- Trim Excess Skin: If there’s any loose or flappy skin, trim it off. This helps the skin crisp up evenly.
- Score the Skin (Optional): This is my little secret weapon. Lightly score the skin a few times with a sharp knife. This allows the fat to render out and the seasoning to penetrate deeper. Be careful not to cut too deep into the meat!
Making Your Magic Spice Blend
Okay, now for the fun part! This is where you get to customize the flavor to your liking. Here’s my go-to spice blend, but feel free to experiment!
My Favorite Drumstick Seasoning Recipe
This recipe is enough for about 8-10 drumsticks. Adjust the amounts as needed.
- 2 tablespoons salt
- 1 tablespoon black pepper
- 2 tablespoons garlic powder
- 2 tablespoons onion powder
- 2 tablespoons paprika (smoked paprika is amazing!)
- 1 tablespoon dried oregano
- 1 teaspoon cayenne pepper (optional, for heat)
Mix all the spices together in a small bowl. Now, grab your prepped drumsticks and let’s get seasoning!
How to Season Like a Pro
- Drizzle with Oil: Place the drumsticks in a large bowl and drizzle with olive oil (about 2-3 tablespoons). Toss to coat evenly.
- Season Generously: Sprinkle the spice mixture over the drumsticks, making sure to coat all sides. Use your hands to rub the seasoning into the skin. Don’t be afraid to get messy!
- Massage the Flavor: Really massage the seasoning into the drumsticks. This helps the flavors meld together and ensures even coverage.
Now, let’s talk about alternatives. If you’re short on time, you can absolutely use a store-bought seasoning blend. Look for something that’s specifically designed for chicken or poultry. Or, if you want to try something completely different, consider using a dry rub for ribs! The HONEY PEPPER CHICKEN PASTA has a great balance of sweet and spicy, and some of those flavors would be delicious here as a dry rub. As another alternative, you could also use a simple marinade, but I find that dry rubs give you the crispiest skin.
Oven Baking: The Crispy Revelation
Alright, it’s time to fire up the oven! This is where the magic happens.
The Perfect Oven Temperature
The ideal oven temperature for crispy drumsticks is 400°F (200°C). This high heat allows the skin to render and crisp up beautifully without drying out the meat.
Baking Time and Technique
- Prepare Your Baking Sheet: Line a baking sheet with parchment paper or foil for easy cleanup. I prefer using a wire rack on top of the baking sheet. This allows air to circulate around the drumsticks, promoting even crisping.
- Arrange the Drumsticks: Place the seasoned drumsticks on the prepared baking sheet, making sure they’re not overcrowded. Leave a little space between each drumstick for even cooking.
- Bake: Bake for 40-45 minutes, or until the internal temperature reaches 165°F (74°C). Use a meat thermometer to ensure they’re fully cooked.
- Flip (Optional): For extra crispy skin, you can flip the drumsticks halfway through baking.
- Broil (Optional): For the ultimate crispy finish, broil the drumsticks for the last 2-3 minutes of baking. Watch them carefully, as they can burn quickly!
Pro Tip: If you notice that the drumsticks are browning too quickly, you can tent them with foil. This will prevent them from burning while still allowing them to cook through.
Serving and Enjoying Your Crispy Creations
Congratulations! You’ve just created the most amazing oven-baked chicken drumsticks. Now, it’s time to enjoy the fruits of your labor!
What to Serve with Drumsticks
Drumsticks are incredibly versatile and pair well with a variety of sides. Here are a few of my favorites:
- Classic Sides: Mashed potatoes, coleslaw, corn on the cob, baked beans.
- Healthy Options: Roasted vegetables, salad, quinoa.
- Comfort Food: Mac and cheese, french fries, onion rings.
Really, anything goes! Get creative and experiment with different flavor combinations. You could even serve them with a side of High-Protein Chicken & Avocado Salad Bowl for a lighter, healthier meal. Leftover drumsticks can also be shredded and used in salads, sandwiches, or even casseroles. If you are looking for more casserole inspiration, you should try the Creamy Chicken and Rice Casserole or the Forgotten Chicken and Rice Casserole . They are both equally good!
Storing Leftovers
If you happen to have any leftovers (which is unlikely!), store them in an airtight container in the refrigerator for up to 3-4 days. Reheat them in the oven, microwave, or air fryer.
Troubleshooting: Common Drumstick Dilemmas
Let’s face it, sometimes things don’t go exactly as planned. Here are a few common drumstick dilemmas and how to solve them.
My Drumsticks Aren’t Crispy Enough!
This is the most common complaint. Here’s what you can do:
- Make sure you’re patting them dry: Moisture is the enemy of crispiness.
- Use a wire rack: This allows air to circulate around the drumsticks, promoting even crisping.
- Broil them at the end: This will give them that extra crispy finish. Watch them carefully, as they can burn quickly!
- Don’t overcrowd the pan: Too many drumsticks on the baking sheet will steam instead of crisping.
My Drumsticks Are Burning!
Uh oh! Here’s what to do:
- Tent them with foil: This will prevent them from burning while still allowing them to cook through.
- Lower the oven temperature: If they’re burning too quickly, reduce the oven temperature by 25 degrees.
- Move the baking sheet to a lower rack: This will help to reduce the heat on the top of the drumsticks.
My Drumsticks Are Still Pink Inside!
Safety first! Here’s what to do:
- Use a meat thermometer: This is the best way to ensure that the drumsticks are fully cooked. They should reach an internal temperature of 165°F (74°C).
- Continue baking: If they’re still pink inside, continue baking them for another 5-10 minutes, or until they reach the proper temperature.
Variations to Try: Spice It Up!
Once you’ve mastered the basic recipe, the possibilities are endless! Here are a few variations to try:
Honey Garlic Drumsticks
Combine honey, garlic, soy sauce, and a touch of ginger for a sweet and savory glaze.
BBQ Drumsticks
Brush the drumsticks with your favorite BBQ sauce during the last 15 minutes of baking.
Lemon Herb Drumsticks
Add lemon zest, fresh herbs (like rosemary and thyme), and a squeeze of lemon juice to the spice blend.
Another spicy option is the Bang Bang Chicken Bowl, which is a great reference for flavors to try.Spicy Buffalo Drumsticks
Toss the cooked drumsticks in buffalo wing sauce for a fiery kick. Serve with blue cheese dressing and celery sticks.
Final Thoughts: Drumstick Domination!
There you have it! My complete guide to making the most amazing Easy Oven Baked Chicken Drumsticks – Crispy & Quick! that you’ll ever taste. With a little practice and these helpful tips, you’ll be a drumstick master in no time. So, go ahead and give it a try. I promise you won’t be disappointed. Get ready to impress your family and friends with your newfound drumstick skills!
What is the key to achieving crispy skin on oven-baked chicken drumsticks?
The key to crispy skin is proper preparation, the right oven temperature (400°F/200°C), and a flavorful seasoning blend. Specifically, patting the drumsticks dry, trimming excess skin, and using a wire rack while baking are crucial steps.
What ingredients are needed for the basic seasoning blend for these drumsticks?
The basic seasoning blend includes salt, pepper, garlic powder, onion powder, paprika (smoked paprika is recommended), and dried oregano. Cayenne pepper can be added for heat.
How do I prevent my drumsticks from burning in the oven?
If the drumsticks are browning too quickly, you can tent them with foil to prevent burning while still allowing them to cook through. You can also lower the oven temperature by 25 degrees or move the baking sheet to a lower rack.
What is the recommended internal temperature for safely cooked chicken drumsticks?
The recommended internal temperature for safely cooked chicken drumsticks is 165°F (74°C). Use a meat thermometer to ensure they are fully cooked.
Crispy Oven Baked Chicken Drumsticks
Ingredients
Equipment
Method
- Preheat oven to 400°F (200°C).
- Line a baking sheet with parchment paper or foil. Place a wire rack on top of the baking sheet for extra crispiness.
- Pat the chicken drumsticks thoroughly dry with paper towels.
- Trim any excess or loose skin from the drumsticks.
- Optional: Lightly score the skin a few times with a sharp knife, being careful not to cut too deep into the meat.
- In a small bowl, mix together salt, black pepper, garlic powder, onion powder, paprika, oregano, and cayenne pepper (if using).
- Place the drumsticks in a large bowl and drizzle with olive oil. Toss to coat evenly.
- Sprinkle the spice mixture over the drumsticks, making sure to coat all sides. Use your hands to rub the seasoning into the skin, massaging it in well.
- Arrange the seasoned drumsticks on the prepared baking sheet, leaving a little space between each drumstick.
- Bake for 40-45 minutes, or until the internal temperature reaches 165°F (74°C). Use a meat thermometer to ensure they’re fully cooked.
- Optional: Flip the drumsticks halfway through baking for extra crispy skin.
- Optional: For the ultimate crispy finish, broil the drumsticks for the last 2-3 minutes of baking. Watch them carefully, as they can burn quickly.
- Remove from oven and let rest for a few minutes before serving.

")