
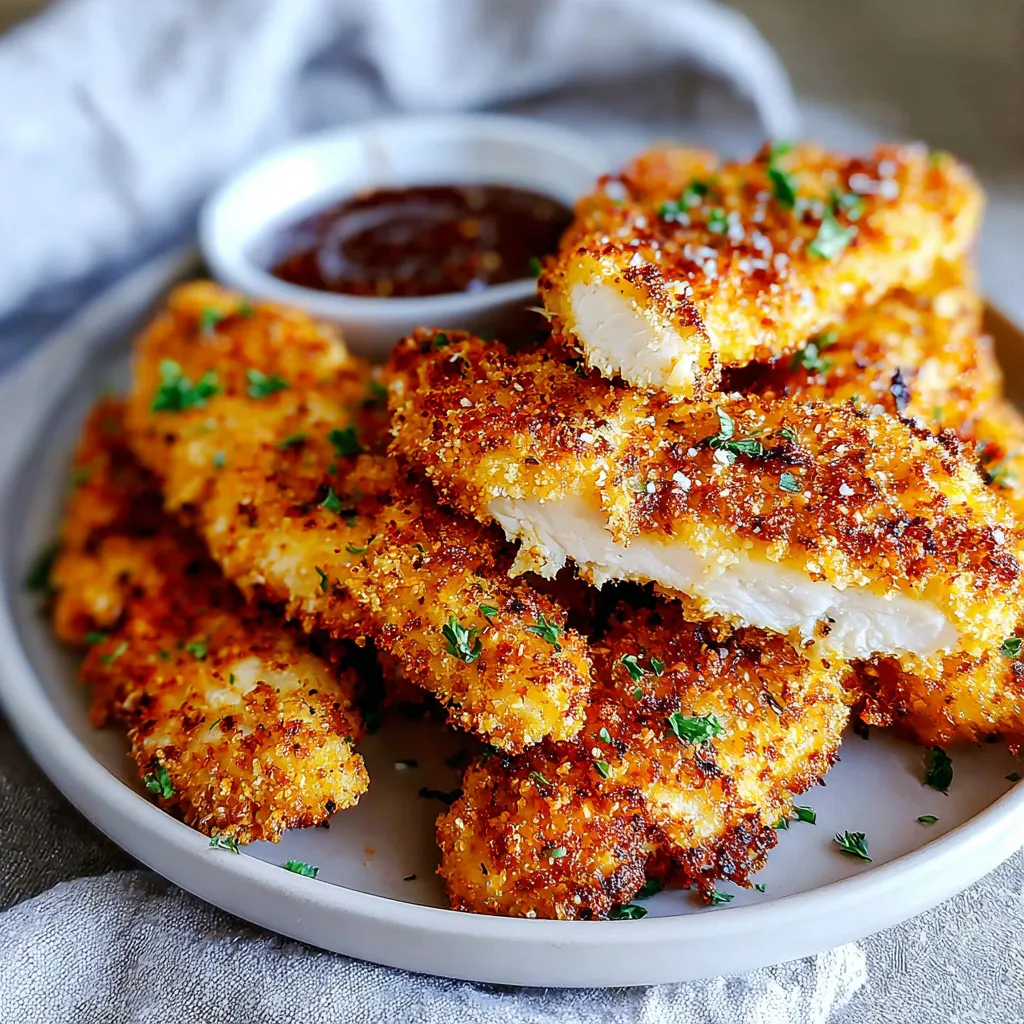
I can still picture my little brother, maybe eight years old, completely covered in breadcrumbs. He was “helping” me make chicken nuggets for dinner, and more of the coating ended up on him than on the chicken! While those early attempts were…messy, they sparked a lifelong love of crispy chicken. Now, I’ve perfected a recipe that’s not only delicious but also incredibly simple to make at home: Easy Crispy Homemade Baked Chicken Tenders. The best part? No deep frying required! Today, I’m sharing all my secrets for the most flavorful and perfectly crispy Easy Crispy Homemade Baked Chicken Tenders you’ll ever make!
The Secret to the Crispiest Baked Chicken Tenders

Okay, friend, let’s get real. Baked chicken tenders can sometimes be…well, a little sad. They can be pale, dry, and definitely lacking that satisfying crunch we all crave. But don’t worry! I’ve cracked the code to achieving truly crispy, golden-brown perfection without ever touching a deep fryer. The secret lies in a few key techniques and ingredients that I’m about to share with you. Get ready to transform your weeknight dinners!
Choosing the Right Chicken
First things first, let’s talk chicken. The quality of your chicken makes a HUGE difference in the final result. I always recommend using boneless, skinless chicken breasts and cutting them into tender-sized strips. Here’s why:
- Even Cooking: Tenders cut from chicken breasts cook more evenly than irregularly shaped pieces.
- Tenderness: Chicken breast is naturally tender, and cutting it into strips ensures it stays that way during baking.
- Versatility: These tenders are incredibly versatile and can be used in so many different ways (more on that later!).
When selecting your chicken, look for breasts that are plump, firm, and pink. Avoid any that look discolored or have an off odor. Fresh is always best, but frozen chicken breasts that have been properly thawed are also perfectly fine.
The Magic of the Marinade
Don’t skip the marinade! This is where we infuse the chicken with flavor and ensure it stays juicy during baking. My go-to marinade is super simple, but it packs a serious punch:
- Buttermilk: Buttermilk tenderizes the chicken and helps the breading adhere.
- Hot Sauce: Just a touch of hot sauce adds a subtle kick that you won’t even notice, but it enhances the other flavors beautifully.
- Garlic Powder & Onion Powder: These are flavor powerhouses that add depth and complexity.
- Salt & Pepper: Essential for seasoning the chicken.
Simply whisk together the marinade ingredients in a bowl, add the chicken tenders, and let them soak for at least 30 minutes. I recommend marinating for 2-4 hours for the best results. The longer they marinate, the more flavorful and tender they’ll become. Don’t worry if you forget about them and they go a little longer – that’s totally fine!
The Breadcrumb Breakthrough
Now for the most important part: the breading! This is where we create that crispy, golden-brown crust we’re all after. Here’s my secret weapon:
A Combination of Panko Breadcrumbs and Regular Breadcrumbs. Panko breadcrumbs are Japanese-style breadcrumbs that are larger and airier than regular breadcrumbs. They create an incredibly crispy texture when baked. Combining them with regular breadcrumbs provides the perfect balance of crunch and coverage.
Here’s what you’ll need for the breading:
- Panko Breadcrumbs
- Regular Breadcrumbs
- Grated Parmesan Cheese: Adds a salty, savory flavor and helps the breading brown.
- Italian Seasoning: A blend of herbs that adds a classic Italian flavor.
- Paprika: Adds color and a subtle smoky flavor.
- Garlic Powder & Onion Powder: Because you can never have too much flavor!
- Salt & Pepper: To season the breading.
In a shallow dish, combine all the breading ingredients and mix well. Make sure there are no clumps of spices.
The Breading Process: A Step-by-Step Guide
This is where things can get a little messy, but trust me, it’s worth it! Here’s my foolproof breading process:
- Set up a Breading Station: Place the marinated chicken tenders, the breadcrumb mixture, and a baking sheet lined with parchment paper or a silicone baking mat in a row.
- Dredge the Chicken: One at a time, remove a chicken tender from the marinade, letting any excess drip off. Dredge it in the breadcrumb mixture, pressing gently to ensure the breadcrumbs adhere to all sides.
- Place on Baking Sheet: Place the breaded chicken tender on the prepared baking sheet.
- Repeat: Repeat the process with the remaining chicken tenders.
Pro Tip: Use one hand for dipping the chicken into the marinade and the other hand for dredging it in the breadcrumbs. This will help prevent your hands from becoming a sticky mess!
The Baking Breakthrough: Achieving Golden-Brown Perfection
Now for the final step: baking! Here’s how to achieve that golden-brown, crispy perfection you’re dreaming of:
- Preheat Your Oven: Preheat your oven to 400°F (200°C). This high temperature is key to achieving crispy chicken tenders.
- Bake: Bake the chicken tenders for 15-20 minutes, or until they are golden brown and cooked through. The internal temperature should reach 165°F (74°C).
- Flip (Optional): For even browning, you can flip the chicken tenders halfway through baking. However, I find that they usually brown evenly enough without flipping.
Important Note: Baking times may vary depending on your oven. Keep an eye on the chicken tenders and adjust the baking time as needed.
Serving Suggestions: Beyond the Basics
These Easy Crispy Homemade Baked Chicken Tenders are delicious on their own, but they’re also incredibly versatile. Here are a few of my favorite ways to serve them:
- Classic with Dipping Sauces: Serve them with your favorite dipping sauces, such as honey mustard, ranch, barbecue sauce, or ketchup.
- Chicken Tender Salad: Slice the chicken tenders and add them to a salad for a protein-packed meal. Consider making a High-Protein Chicken & Avocado Salad Bowl and using the chicken tenders instead of grilled chicken.
- Chicken Tender Wraps: Wrap the chicken tenders in tortillas with lettuce, tomato, and your favorite sauce.
- Chicken Tender Sandwiches: Serve the chicken tenders on buns with lettuce, tomato, and mayo.
- Chicken Tender Pasta: Dice up the crispy chicken and add it to your pasta dishes, like the HONEY PEPPER CHICKEN PASTA, for an extra boost of protein and flavor.
Speaking of pasta, you could also try cutting the tenders into smaller pieces and adding them to a batch of Spicy Chicken Rigatoni for a fun twist on a classic!
Tips and Tricks for Perfect Chicken Tenders
Here are a few more tips and tricks to help you achieve chicken tender perfection:
- Don’t Overcrowd the Baking Sheet: Overcrowding the baking sheet will steam the chicken tenders instead of baking them, resulting in soggy tenders. Make sure to leave some space between each tender.
- Use a Wire Rack: For even crispier tenders, place a wire rack on top of the baking sheet and place the breaded chicken tenders on the rack. This will allow air to circulate around the chicken tenders, resulting in a crispier crust.
- Spray with Cooking Spray: Before baking, spray the breaded chicken tenders with cooking spray. This will help them brown and crisp up even more.
- Adjust Seasonings to Your Taste: Feel free to adjust the seasonings in the marinade and breading to your liking. Add more or less of your favorite spices.
- Make Ahead: You can bread the chicken tenders ahead of time and store them in the refrigerator for up to 24 hours before baking. This is a great way to save time on busy weeknights.
- Freezing Instructions: Breaded chicken tenders can be frozen for up to 3 months. Freeze them in a single layer on a baking sheet, then transfer them to a freezer bag. Bake from frozen, adding a few extra minutes to the baking time.
What About Leftovers?
If you happen to have any leftover chicken tenders (which is rare!), they can be stored in the refrigerator for up to 3-4 days. Reheat them in the oven or air fryer for the best results. Microwaving them will make them soggy.
Consider using leftover chicken in a quick and easy Forgotten Chicken and Rice Casserole for a comforting and satisfying meal.
You can also adapt this recipe to work in your slow cooker. It’s not quite the same as crispy baked, but in a pinch, you can make a shredded chicken version similar to SLOW COOKER LEMON CHICKEN. Just add the marinated chicken to your slow cooker with a cup of chicken broth and cook on low for 6-8 hours, then shred and enjoy in sandwiches or wraps.
Ready to Make the Best Baked Chicken Tenders Ever?
So there you have it! My complete guide to making Easy Crispy Homemade Baked Chicken Tenders. With these tips and tricks, you’ll be able to create restaurant-quality chicken tenders in the comfort of your own home. These are so much better than store-bought, and you control all the ingredients, making them a healthier and more delicious option for your family. Get ready to impress everyone with your amazing cooking skills! I know you can do it!
What is the key to getting crispy baked chicken tenders without deep frying?
The secret to crispy baked chicken tenders lies in using a combination of panko and regular breadcrumbs for the breading, ensuring a proper marinade, and baking at a high temperature (400°F/200°C).
Why is buttermilk used in the marinade?
Buttermilk tenderizes the chicken and helps the breading adhere better.
Can I prepare the chicken tenders ahead of time?
Yes, you can bread the chicken tenders ahead of time and store them in the refrigerator for up to 24 hours before baking, or freeze them for up to 3 months.
What are some serving suggestions for these chicken tenders?
These chicken tenders can be served with dipping sauces, in salads, wraps, sandwiches, or added to pasta dishes.
Crispy Baked Chicken Tenders
Ingredients
Equipment
Method
- Preheat oven to 400°F (200°C). Line a baking sheet with parchment paper or a silicone baking mat.
- In a mixing bowl, whisk together buttermilk, hot sauce, garlic powder, onion powder, salt, and pepper.
- Add chicken tenders to the marinade and let soak for at least 30 minutes, or up to 4 hours, in the refrigerator.
- In a shallow dish, combine panko breadcrumbs, regular breadcrumbs, Parmesan cheese, Italian seasoning, paprika, garlic powder, onion powder, salt, and pepper.
- Set up a breading station with the marinated chicken tenders, breadcrumb mixture, and prepared baking sheet.
- Remove a chicken tender from the marinade, letting any excess drip off. Dredge it in the breadcrumb mixture, pressing gently to ensure the breadcrumbs adhere to all sides.
- Place the breaded chicken tender on the prepared baking sheet.
- Repeat the process with the remaining chicken tenders, spacing them evenly on the baking sheet.
- Spray the breaded chicken tenders with cooking spray.
- Bake for 15-20 minutes, or until golden brown and the internal temperature reaches 165°F (74°C).
- Flip the chicken tenders halfway through baking for even browning (optional).
- Remove from oven and let cool slightly before serving.


")